

I have wanted to
write about how I make my own brooches for awhile now. With thanksgiving in the US I thought that is was more appropriate to write on something that
can be given, instead of eaten in mild disgust!
Like many of you out there the
holidays can prove to be a very expensive time of year. You sashay out into the
malls and the inter-webs hoping that you will find something that will be
thoughtful and different enough from last year, and then pray that it gets here
in time to be wrapped, and watch as your bank account slowly shrinks. I know
it’s not about the amount spent, it’s about the thought. What’s more thoughtful
than something handmade by you?
That’s why I
thought I would share with you beautiful folks my thoughtful and wallet
friendly gift idea of handmade brooches! Now you can make these as personal and
as intricate, or as simple as you like. You can also make yourself all those
retro inspired brooches that your heart desires. Be forewarned they are not a super
quick project. However they can be made by all ages so long as there is oven
supervision for the little ones!
Below are the supplies that I use on the
regular:
Shrinky dinks/scissors/tin foil/glue gun/paint brushes/GLITTER/embossing powder/acrylic paint or colored pencils/brooch backs/E6000 glue
Some
of these items you probably already have at home, and if not, a lot of
these you can find for cheap at a craft store. I found the shrink paper
at a Joann’s craft store for $5.00 and there’s enough sheets for 5
brooches!
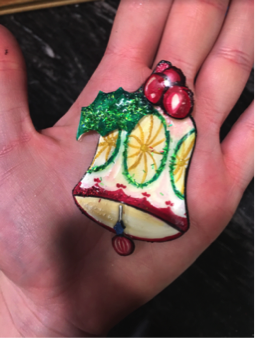
Step 1: Find Inspiration
The
hardest part about this project was finding the inspiration for a
brooch as I was making this simply for this blog entry and not for a
gift. I googled “vintage
1950s Christmas” and found this cutie, simple enough and not terribly
intricate? I’m laughing at myself right now because it was not as easy
as I thought it would be.

Step 2: Sketch it out on the shrink dink preheat oven to 375* or 175 C*
I
cannot stress this enough! YOUR ART MUST TAKE UP THE ENTIRE SHEET, If
your main design is not large enough on the shrink film it will be too
tiny for a brooch! I like to make my center piece first and then add on
the other pieces around it in the spare space.

Step 3: Paint it or color it
I like to use acrylic paint as it just makes it easier to really
saturate the color. Try to use even layers of paint as a build up will
cause the surface of the brooch to be bumpy. You can use colored pencils
if you like, just make sure you get all areas colored in as anything
missed will be seen on the final product.

Step 4: Add glitter to desired areas
This step is optional but can add fun flare to your brooch! I like to add the glitter carefully while the paint is a little wet so that it sticks!

Step 5: Let it dry
Super important, if you try to cut these out before the paint is dry you will have a big smeared mess!
Step 6: Cut out the pieces
Pretty self explanatory, but be careful as the shrink dink film can tear when you cut it.
Step 7: Arrange Shrinky Dinks on tin foiled lined baking sheet
Do
not put shrink film directly on a pan, unless you don’t use that pan to
cook food on. Adult supervision is required at this stage. Bake per instructions on the packet for 1-3
minutes and check periodically.

Step 8: Embossing powder
I
highly recommend this step as it will make your brooch nice and shiny
and give it that resin appearance. Do this after your brooch has been
cooked. Embossing powder in clear can be found on Amazon or in the stamp
isle of your craft store. I use the cheap stuff but higher quality will
reflect in the overall appearance.
Make sure you cover the entire
brooch with a nice even layer of the Embossing powder. Too much and it
will look cloudy, not enough and you’ll have to add more later. I go off
adding enough until I can just barely make out the design underneath.
This
is not enough you need to add enough that they designs are just barely
visible, however if you prefer a more matte appearance use less.
BAKE THEM AGAIN for 1 minute or until the powder has melted.

Step 9: Glue the 3d bits onto the brooch
Now
the back won’t be pretty but you won’t be looking at the back so don’t
worry. If you are not happy with that then you can glue felt to the back
and cover up anything that you don’t like. I use e6000 glue for the
Shrinky Dink 3d parts, I use hot glue for the brooch back but you can
use the E6000 for that too.
**** Hot glue is not strong enough to hold the Shrinky Dink 3D bits. If you use hot glue for those they will break off ****

Step 10: wear it or wrap it!
The best part! I
really love being able to make my own brooches from time to time, If I
have an idea in my head I can make it happen. Its pretty simple and
inexpensive (once the initial purchases are over).
This is not limited
to Brooches, you can make earrings and necklaces as well. You will need a
hole punch for that though!

I
like to pair my brooches with cropped cardigans as I find they don’t
put holes in the fabric and the colors are nice and saturated.
Campbell
Crafts has an amazing selection of cute cropped cardigans here:
***** http://campbell-crafts.com/section/114/cardigans *****
I hope that you enjoyed this and that you got a little bit of inspiration
from it! It’s a fun and easy way to make a specialized gift for a
friend or just a little something for yourself!


0 comments:
Post a Comment